Table of contents
Key Takeaways
Keratin treatment is a popular hair smoothening treatment known to repair damage, strengthen strands, and eliminate frizz. Both at-home and salon keratin treatments aim to leave hair smooth and manageable. At-home kits are affordable and take less time, whereas in-salon treatments give longer desired results but come with a cost. This blog helps you decide what’s best for you.
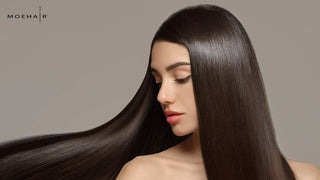
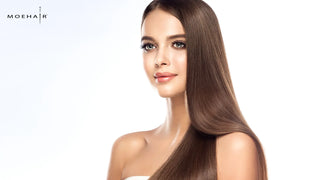
Smooth, straight, and frizz-free hair has outlasted for decades, perennially favorite and approved by healthy hair connoisseurs. But struggling to keep up with that perfect look-book hair is a real challenge. Blame it on external aggressors like dirt, dust, UV rays, pollution, and frequent use of heat styling tools—hair damage and frizz creep in like unwanted guests. This is where keratin smoothening treatment steps in as a rescue.
What is keratin?
Keratin is a natural structural protein in hair, skin, and nails. Due to the high cysteine content in keratin and the disulfide bonds, keratin protein confers mechanical strength to strands. Over time, as the protein starts to deplete, it results in hair damage, frizz, breakage, and strand weakening. Whether you opt for at-home or salon keratin treatment, it is targeted towards replenishing the lost proteins, smoothening hair, and improving overall vitality. In this blog, we give a breakdown of both salon and at-home keratin treatments to clear the cloud of confusion.
Benefits of Keratin Hair Treatment
Known as the ultimate hair smoothening treatment, replenishing damaged hair with keratin protein helps reduce frizz, strengthen strands, and smoothen cuticles. Here are some of the benefits of keratin hair treatment:
- Improves texture — Keratin fills the gaps created by lost protein, smoothing the hair cuticle and eliminating frizz and flyaways.
- Strengthens strands — Keratin protein, with its disulfide bonds, acts as the backbone of hair strands and strengthens them. As the structural protein enhances strength, it improves strand vitality and reduces breakage.
- Reduces hair damage — The keratin solution acts as a protective coating and fills gaps in the hair cuticle. As a result, it repairs hair damage, reduces dryness, and prevents coarse strands. The added layer also helps protect hair from environmental aggressors.
- Shiny and glossy hair – As the keratin protein is heat-sealed, it adds shine and a glossy appearance to the strand.
- Reduces styling time — Keratin-treated hair is easier to style and maintain due to improved manageability. Save time with effortless styling.
At-Home Keratin Treatments – What You Need to Know?
With the increased emphasis on the benefits of keratin for hair, many hair care products are infused with the protein. At-home keratin treatments are DIY kits with step-by-step instructions that can be used at home. As hairstylist Jackson Simmonds told Byrdie, “A keratin treatment will infuse keratinous fiber and protein back into the hair lacking those things.”
Many people prefer DIY at-home treatment as it is cost-effective, less time-consuming, and does the job of infusing strands with keratin protein just right. Many keratin kits are free of chemicals like formaldehyde, making them an attractive option over their salon counterparts. The formulations are tailored to leave your hair smooth, shiny, and frizz-free.

Steps on applying at-home keratin treatments:
- Wash your hair first with a clarifying shampoo to remove dirt, dust, and product buildup.
- Divide hair into sections and clip each section for ease of application.
- Take the required amount of keratin solution in a bowl. Start applying using a brush to each section.
- Let it process for the instructed time, then rinse the hair well with water to ensure the solution is out. Use cold or lukewarm water only.
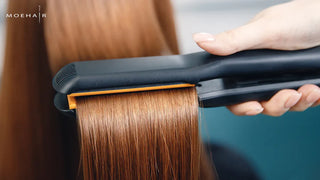
- Blow dry your hair completely, then use a flat iron over each section to seal the keratin solution. Repeat running the flat iron on sections as needed.
- Give 48 – 72 hours for the treatment to settle in before using shampoo to wash your hair.
Note: Every at-home keratin kit might have different instructions. Read the instructions thoroughly before starting the application process.
Pros of at-home keratin treatment:

- Cost-effective – On comparing keratin treatment at home with in-salon treatment, the former comes at an affordable price.
- Less time-consuming — If you don’t want to spend hours in the salon yet want smooth, silky hair, try a DIY keratin kit at home. It takes less time than salon treatment.
- Infused with hair-boosting ingredients — Choosing keratin kits free of chemicals like formaldehyde is flexible. Some of the best at-home keratin treatments are infused with ingredients like chia seeds, aloe vera, banana extract, etc
Cons of at-home keratin treatment:
- The results from at-home keratin application might not be as effective as those from a professional keratin treatment at a salon.
- Salons use high-quality products to deliver optimal results. However, DIY treatments might have slightly inferior quality as compared to professional-grade keratin products.
- DIY treatments without prior experience might make individuals prone to allergies or ingredient sensitivity. Also, not all products are formulated for all hair types, limiting their use.
- Compared to salon treatment, at-home keratin use requires more frequent application, and the results often last for a shorter period.
In-Salon Keratin Treatments – What You Need to Know?
Despite the popularity of at-home keratin treatment, the demand for salon treatment continues. One of the most significant advantages of getting a keratin treatment at home is expert supervision and using the finest products. The application of keratin solution fortifies the strands with keratin and helps in achieving silky, glossy, smooth, and frizz-free hair. Generally, here is the process involved in getting salon keratin treatment.

- Consultation - Before getting keratin treatment at the salon, consulting with a professional stylist precedes it. During this process, the hair type and texture are analyzed. Stylists recommend and use products that are best suitable for your hair.
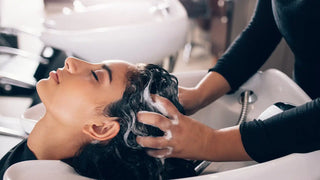
- Preparation — Once the consultation is over, hair is prepared to ensure better longevity and outcome of the treatment. Hair is washed and cleansed with a clarifying shampoo to remove impurities and product buildup and ensure better effectiveness of the treatment.
- Application — A hairdresser or stylist applies the solution evenly throughout the hair during a keratin hair treatment. The blend of proteins coats the hair strands evenly, ensuring uniform distribution.
- Processing Time — After applying the treatment to your hair, it is allowed to sit for around 30 minutes for effective absorption through the hair shaft. However, the processing time depends on the brand and formulation.
- Heat Sealing — After processing, the keratin solution is blown, dried, and heat-sealed using a flat iron. This step is crucial as it helps lock the treatment and its absorption through the hair shaft for a frizz-free, long-lasting finish.
Pros of salon keratin treatment
- Professional expertise — Salons have skilled and experienced hairstylists with years of experience and training in performing such treatments. Their expertise helps achieve an effective outcome from keratin therapy.
- High-end products – One of the best advantages of getting keratin treatment at a salon is access to superior professional products. While some keratin formulations include formaldehyde, options free of toxic chemicals are also available.
- Good professionals — The process is done step by step with utmost perfection. From application to uniform distribution to the use of flat at the right temperature, everything is done with precision, ensuring no hair damage. Salons have professional-grade tools that give optimal results.
- Hassle-free process — In a salon, you don’t have to worry about applying the solution and can, hence, relax while undergoing the process.
- Guidance on aftercare – Salon professionals help with proper aftercare guidance on the products to use, styling tips, and overall maintenance for better longevity.
Cons of salon keratin treatment
- Expensive process — Compared to at-home keratin treatment, opting for a treatment at a salon is expensive. The price varies depending on the type of salon, the expertise of the hairdresser, and the locality of the salon.
- Time-consuming — Salon-based treatments take longer to complete than DIY keratin therapy at home. Be prepared to sit at the salon for 3 to 4 hours to complete the treatment.
Cost Comparison – At-Home vs. In-Salon Keratin Treatment

Even the best at-home keratin treatment would cost less than a professional salon-based treatment. When comparing at-home vs. in-salon treatments, many factors come into play, like upfront service cost, product price, aftercare maintenance cost, and the frequency of touch-ups necessary. Depending on hair length, thickness, and salon type, the in-salon cost may range from $100 to $600. However, home DIY kits range from $50 - $200.
Also Read - Keratin Treatment Cost In USA
Longevity and Maintenance
Whether you have got keratin treatment at home or opted for in-salon service, your hair needs aftercare in both cases. Salon treatments typically last longer than at-home options. Salon-grade products are comparatively stronger, and with experienced professionals applying them, they give lasting, effective results. However, here are a few tips to ensure better longevity of the keratin hair treatment:
Wait before washing
Wait 72 hours to wash your hair. If it is washed before 48 – 72 hours, it might not give the desired outcome. Let the keratin formulation penetrate the hair cuticles to soften and smooth hair and help with frizz-free transformation.
Use keratin-infused products
Always use haircare products tailored for keratin-treated hair. To prolong the treatment, use sulfate—and paraben-free shampoo. Products infused with keratin help prolong maintenance. Try a keratin-infused serum and leave-in conditioner to keep hair safe from humidity.
Caution from salt and chlorine
Make sure to wear a swimming cap before diving into a pool or swimming on a beach. Salt and chlorine interfere with the keratin coating on hair, leading to drying and damage. Always wash your hair after going for a swim. As Raphael Roque, senior stylist at Rob Peetoom Williamsburg, told Instyle, “Salt breaks down any chemical service, be it a perm, relaxer, or keratin treatment.”
Deep cleansing
Give your scalp and hair a complete reset once a month. For best results, use a deep-cleansing shampoo like Moehair Clarifying Shampoo. Avoid using exfoliators, as they might strip down the keratin layer faster than expected.
Root Touch-ups
Although getting keratin treatment frequently is not recommended, root-ups are advised. It is newly grown hair and not chemically treated, so it will not damage the hair. Speak to your hairstylist and book a consultation for getting the same.
Take our Hair Quiz for personalized recommendations, and flaunt your stunning, smooth hair for longer.
Making the Decision – Factors to Consider
Now comes the big question – in-salon vs at-home keratin treatment, which is better? The ultimate decision weighs down on many factors. Here are a few things to consider:
- Hair type and texture — If you have extremely frizzy and damaged hair, it is a good idea to opt for salon keratin treatment after consulting a professional and under guided supervision. However, for less damaged hair that requires a little bit of smoothing, try the DIY keratin kits at home.
- Desired longevity of results – The longevity of keratin treatment at home is less than salon-based treatment. Hence if you are looking for the keratin result to last longer, it is recommended to opt for in-salon keratin.
- Budget — Salons will always be expensive compared to at-home DIY options. If you are on a budget crunch, try keratin kits formulated for home use.
- Experience — If you are doubtful about how the treatment will work and have never applied keratin, it is best to consult a professional. Skilled professionals do in-salon keratin treatments.
While in-salon keratin treatments favorably give better results, it is important to consider hidden expenses. You are not just paying for the product but also for the service and would need to invest in aftercare products. With easy-to-use and effective at-home keratin kits, many people are slowly leaning toward the DIY option. Whether you choose at-home or in-salon treatment, consider the options after weighing down aspects like budget, time, product used, experience, expertise, and desired longevity.
FAQs
1. On comparing at-home vs in-salon keratin treatment, which is more affordable?
At-home keratin treatment is more affordable than in-salon treatment as the latter varies depending on salon location, expertise level, and product quality.
2. Are at-home keratin treatments effective?
Yes, at-home keratin treatments are effective, but the products, hair type, and texture determine their effectiveness. DIY keratin kits have detailed instructions that, when followed prudently, produce positive outcomes such as frizz-free hair, reduced damage, dryness, and smooth hair.
3. Are there any hidden costs involved in keratin treatment?
Besides the upfront cost of getting the keratin treatment, the hidden cost usually involves the aftercare cost. This involves purchasing good aftercare products for keratin-treated hair, root touch-ups, etc.
4. Is consultation before getting a keratin treatment necessary?
Although it is not mandatory, it is recommended to get a consultation as it helps in the analysis of hair type, texture, and which treatment is the most suitable.
5. How long does a keratin treatment last?
The longevity of the treatment depends on hair type and aftercare. Usually, at-home keratin treatment lasts 2 – 3 months whereas in-salon treatment lasts 3 to 6 months.
References
https://www.ncbi.nlm.nih.gov/pmc/articles/PMC8052392/https://cosmeticworld.ca/blogs/articles/keratin-treatment-cost?variant=43114730193134
https://www.byrdie.com/keratin-treatment-7099543
https://www.instyle.com/how-to-maintain-a-keratin-treatment-8417233
How we reviewed this article:
Our experts continually monitor the fashion and beauty space, and we update our articles when new information becomes available.
-
Current Version
-
Jun 4, 2024
Written By -
Upasana Kakati is a lifestyle writer with 7+ years of experience in writing in the beauty and haircare industry.
Edited By -
Saima Ahmed with 8+ yrs of experience, specializes in crafting engaging content focused on Hair care, lifestyle, and beauty.