 Table of contents
We hear you saying - bouncy, voluminous, and glossy curls. While some people are blessed with natural curls, it takes the help of styling tools for others. You might want to know how to curl your hair and keep it coiled longer, especially as a beginner. If you are trying your hands for the first time curling your hair, we have got you covered.
Why curl your hair?
Curls give your hair volume, bounce, and definition. It turns wavy and even straight hair into gorgeous twirls. Above everything, it provides a makeover and a chance to experiment with your hair and overall look. However, as a beginner, it may feel intimidating, but Moehair is here for your rescue. We spill the beans –how to curl your hair, the right tools, easy techniques, and caring for curls!
Preparing your hair before starting the curling process
Curling your hair with a hair straightener or curler involves heat that might damage hair. Exposure to high temperature impacts the cuticles, dries up hair strands, and alters the keratin proteins.
It is essential to follow these simple instructions to minimize damage and get the perfect curls:- Always use a heat protectant spray before using styling tools. It shields the strands and doesn’t compromise the integrity of the hair structure.
- Start practicing with tools like a flat iron or curling tongs in switch off mode. This acquaints you with the techniques.
- Also, keep the hairbrush and hair sectioning clips handy. The hairbrush helps with the gentle combing of strands during the process. Hair clips assist with sectioning hair for seamless curling.
Different types of tools for curling hair
 Before jumping into how to curl your hair , it is crucial to know about the types of hair curling tools. And, you will be surprised it is not limited to curling irons. Now that we got your attention, let’s jump straight into the assortment of tools used for curling hair.
- Curling Irons - Getting dreamy curls and ringlets for a long time has been synonymous with using the coveted irons. A curling iron has a clamp or clip that holds hair against the tool, resulting in uniform, defined, and tighter curls. It is perfect if you are looking for long-lasting curls.
- Curling wands – It is similar to curling iron but without a clamp. Instead of clipping the hair, it is twisted around the hot barrel to achieve the curls. If you are looking for loose curls or messy waves, it’s your go-to curling tool.
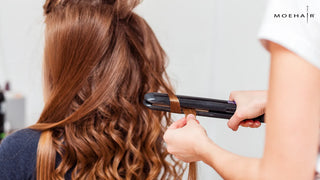
- Flat irons – This might come as a surprise, but your flat iron can help you get curls. If you are learning how to curl your hair , a straightener is good to start with. Twist the hair section using the flat iron and slowly glide it down your hair. It’s perfect for achieving soft curls.
Depending on the type of curls you are willing to achieve and your expertise, you can opt for either of the above curling tools. While curling irons and wands are specially designed for getting curls, flat iron swings both ways to get straight and curly hair.
Beginner-friendly techniques for curling hair

Although there are a slew of techniques for curling hair, as a newbie, we limit it to just a few basic ones. Assuming you are a beginner with little curling hair experience, it’s wise to take the learning curve slow. Here are a few ways to get curl-ready.
Ribbon curl with flat iron
Instead of wrapping your hair with a bunch of tools and techniques, learn how to curl hair with a straightener for starters. Put your flat iron to work and get those gorgeous ribbon curls, and how?
- Ribbon curls are tight curls that give voluminous and bouncy hair. Divide your hair into sections. Take the section you want to curl and clip the rest of it.
- Diagonally place the flat iron into the hair section and clasp it between the iron plates. Slowly rotate the straightener and let it take half a turn. Slowly slide the flat iron to the end of the hair section and release the hair.
- This creates a tight ribbon curl. Repeat the process for the rest of your clipped hair sections.
S-Waves curls using a flat iron
Also known as the push method, the S-wave curls are loose and messy. If you are looking for an easy technique on how to curl your hair , let’s get you started!
- Take a section of hair and clip the remaining. Hold the section or pinch with your index finger and thumb.
- Start from the top, but slightly away from the roots. Create an S-shaped bend as you move the pinch down the length and gently tap the flat iron.
- This creates an S-shaped pattern. Repeat for all the hair sections and unfurl the loose, wavy curls.
Loose curls with curling iron
As much as flat irons are effective, you cannot ignore the efficiency of curling irons. So as a beginner, here is how to curl your hair and get flawless loose curls.
- Divide the hair into sections and separate using clips or clamps. Start with one section of hair strands and wrap it around the curling iron.
- Close the curling iron near the scalp part of the hair section. After flat-wrapping the section, roll the iron along the length and hold for a few seconds before letting go.
- Repeat the process for the remaining hair sections.
Tips to prevent hair damage while curling your hair

Now that you are acquainted with the tools and beginner techniques, you must take care of a few things to prevent hair damage.
- Always use a curling tool on dry hair. Wet hair is prone to damage as the cuticles are open and exposed.
- Don’t overuse curling iron or straighteners on already damaged hair. This further weakens and breaks the disulfide bonds leading to frizzier hair
- Use the lowest temperature setting on the curling tool. This prevents the hair from overheating.
- Always use a heat-protectant spray to shield the strands from direct heat. It acts as a barrier between the heat-radiating curling tools and hair strands.
- On using a curling iron, use the clamp near the root. This gives a uniform and crisp curls without leaving a clamp mark.
- Keep the hair on the curling tool for 5 to 8 seconds, not more. This minimizes the damage that might occur from heat.
- Finish up the curls with hairspray. This keeps the curls in place for longer, soft, and bouncy.
Maintain your gorgeous hair with personalized recommendations—take our Hair Quiz.
References
https://www.healthline.com/health/how-to-prevent-split-endsHow we reviewed this article:
Our experts continually monitor the fashion and beauty space, and we update our articles when new information becomes available.
-
Current Version
-
Oct 4, 2023
Written By -
Upasana Kakati is a lifestyle writer with 7+ years of experience in writing in the beauty and haircare industry.
Edited By -
Saima Ahmed with 8+ yrs of experience, specializes in crafting engaging content focused on Hair care, lifestyle, and beauty.


EthinixSalon
“MoeHair.com, your products are a revelation! My hair has never looked or felt better. Thank you for your commitment to quality and excellence. I’m a loyal fan for life!”